
In my previous tutorial I had shown you how to install and configuration Ansible in a vagrant machine. We have learnt about few very basic Ad-hoc commands as well. Today I am going to discuss about Ansible-playbook which is vital one. In last article I have deployed four vagrant machine of two different OS and today in this tutorial I’ll use those machine to install Apache2 web server using Anisble-playbook. You can find previous tutorial’s vagrantfile here. Before start need to know what is Playbook and some other relevant terminologies. I’ll explain them while writing the YAML aka playbook.
Playbook
Ansible playbooks are a way to send commands to remote computers in a scripted way. Instead of using Ansible commands individually to remotely configure computers from the command line, you can configure entire complex environments by passing a script to one or more systems. In this article I am not going to use play-book, however in future tutorial most of the deployment will conduct using it. So, you better learn more about play-book from official documentation.
YAML
Ansible-playbook is nothing but a YAML file actually. YAML is the abbreviated form of “YAML Ain’t markup language” is a data serialization language which is designed to be human -friendly and works well with other programming languages for everyday tasks. You can learn more about YAML here .
What I am going to do
Install Apache web server using Ansible Play-book.
Prerequisites
- Familiar with Unix/Linux CLI.
- Familiar with Vagrant and it’s basic command.
- Familiar with CentOS and Ubuntu.
- Familiar with SSH.
- Basic Networking and Client-Server communication Knowledge.
** Vagrant should pre-installed in your machine before start this tutorial.**
The Tutorial:-
Step 1
At first check the status of our last tutorial’s machine whether they are running or power off
tech99@tech99:~/Ansible$ vagrant status
ubuntu                    poweroff (virtualbox)
centos                    poweroff (virtualbox)
server1                   poweroff (virtualbox)
server2                   poweroff (virtualbox)
We can see here all the machines are power off, so we have to execute vagrant up command to run them again. After successful execution of vagrant up check vagrant status again:-
ubuntu                    running (virtualbox)
centos                    running (virtualbox)
server1                   running (virtualbox)
server2                   running (virtualbox)
Now all four machine are in running status
Step 2
make a file named apache.yaml in ~/Ansible directory. This apache.yamlis the so called playbook.
tech99@tech99:~/Ansible$ sudo nano apache.yaml
# let write some playbook code in apache.yaml
---
- name: Install Apache Using Playbook
  hosts: 192.168.33.30
  sudo: yes
Explanation: Here the file start with --- (3 hyphens), It is a convention that YAML code start with Them. Next - name: value is playbook name. - hosts indicates the target machine where I am going to install apache. I have used target machine IP address, I could use its name here also. sudo: yes used for ensuring super user privileges. We could use here
became: yes instead of sudo: yes .
# Next I am adding a tasks to code.
tasks:
    - name: Install Apache
      apt:
        name: apache2
        update_cache: yes
        state: latest
Explanation: First tasks list item name is Install Apache. Then add apt: module. It has three items. name: ‘s value is service’s name; Here service is apache2 . update_cache: yes is equivalent of apt-get update . state: latest means it will intalled the latest version of package.
After installation of apache we need to start and enable apache2 service. Add following play code to do that:-
    - name: Start and enable Apache
      service:
         name: apache2
         state: started
         enabled: yes
# Following task or play code is for change default port. Here we change default port in file ports.conf:-
     - name: Change the default port for Apache in ports.conf
       lineinfile:
         path: /etc/apache2/ports.conf
         regexp: '^Listen \d+'
         line: 'Listen {{ newport }}'
       notify:
         - restart apache

vars:
  - newport: 80

handlers:
  - name: restart Apache
    service: name=apache2 state=restarted
Explanation: lineinfile module has used here. lineinfile module ensures a particular line is in a file, or replace an existing line using a back-referenced regular expression. This is primarily useful when you want to change a single line in a file only. I have used three parameters of lineinfile module:-
path: The path to the file to modify. Here we modifying ports.conf file.So, value is /etc/apache2/ports.conf
regexp: This parameter must a string pattern as regular expression. Here matching pattern is “start with the word ‘Listen’, then a space and then any numeric string”.
line: The line to insert/replace into the file where regexp: pattern is satisfied. Here port value will be replace with the value newport variable.
notify: We call Handlers using the notify syntax.
handlers: Tasks are Ansible’s way of doing something and Handlers are our way of calling a Task after some other Task completes. As part of that Playbook, we have a variety of Tasks that carry out the essential tasks that make up our Apache install. Everything from installing Apache through to securing our installation, creating our expected directory structure, and ensuring all our plugins are installed. Now, as part of some of these Tasks (or steps), we would have to re-start Apache. We don’t want to copy and paste a Task over and over, whenever we need to re-start Apache (or any other service for that matter). Instead, we want to put a single Restart Apache Task into our Playbook somehow, and then call that Task as required. That Task we call is a Handler. A task we can re-use multiple times whilst our Playbook runs.
# Following code is for Change the default port in the defaults.conf file:-
     - name: Change the default port in the defaults.conf file
       lineinfile:
         path: /etc/apache2/sites-enabled/000-default.conf
         regexp: '^\'
         line: ''
       notify:
         - restart Apache
vars:
  - newport: 80

handlers:
  - name: restart Apache
    service: name=apache2 state=restarted
# The complete code for apache.yaml is follwing:-
---
- name: Install Apache Using Playbook
  hosts: 192.168.33.30
  sudo: yes
  vars:
    - newport: 80
  handlers:
    - name: restart Apache
      service: name=apache2 state=restarted
  tasks:
    - name: Install Apache
      apt:
        name: apache2
        update_cache: yes
        state: latest
    - name: Start and enable Apache
      service:
        name: apache2
        state: started
        enabled: yes
    - name: Change the default port for Apache in ports.conf
      lineinfile:
        path: /etc/apache2/ports.conf
        regexp: '^Listen \d+'
        line: 'Listen {{ newport }}'
      notify:
        - restart Apache
    - name: Change the default port in the defaults.conf file
      lineinfile:
        path: /etc/apache2/sites-enabled/000-default.conf
        regexp: '^\<VirtualHost \*\:\d+\>'
        line: '<VirtualHost *:{{ newport }}>'
      notify:
        - restart Apache
Congratulation! You have written your first playbook. Next, we are going to implement this playbook target machine using Ansible command
Step 3
login to a controller machine:-
vagrant ssh ubuntu
After successfully logged in to ubuntu, go inside of ~/vagrant/ directory:-
vagrant@ubuntu:~$ cd /vagrant/
Here you could find our vagrantfile and apache.yaml file:-
vagrant@ubuntu:/vagrant$ ls -l

total 8
-rw-rw-r-- 1 vagrant vagrant 3946 May 11 07:27 Vagrantfile
-rw-rw-r-- 1 vagrant vagrant  908 May 12 18:49 apache.yaml
Finally, execute following command to deploy our playbook into target machine:-
vagrant@ubuntu:/vagrant$ ansible-playbook apache.yaml
Output of successfull execution of Ansible playbook:-
PLAY [Install Apache Using Playbook] *********************************************************

TASK [Gathering Facts] ***********************************************************************
ok: [192.168.33.30]

TASK [Install Apache] ************************************************************************
changed: [192.168.33.30]

TASK [Start and enable Apache] ***************************************************************
ok: [192.168.33.30]

TASK [Change the default port for Apache in ports.conf] **************************************
ok: [192.168.33.30]

TASK [Change the default port in the defaults.conf file] *************************************
ok: [192.168.33.30]

PLAY RECAP ***********************************************************************************
192.168.33.30              : ok=5    changed=1    unreachable=0    failed=0
Step 3
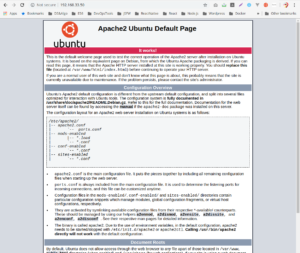
This is the final step. Here we just test whether or not our playbook implemented correctly. Open any browser of your host machine and type target machine IP and press enter. If your browser load the Apache server default page (same as below Image) , then CHEERS!!! you have successfully installed Apache2 web server in a machine using Ansible-playbook. That is the end of today’s tutorial. Thank you all.
nasaslksajdljsalkdjsklajd